In most of my discussions about photography in general and cameras and lenses in particular, one thing that I have realized is that there is a mixed reaction towards the Manual Mode of the camera. While I can easily attribute it to laziness, a bit of introspection and inspection made me realize that there is a partial understanding of the basic concepts in the first place. While most of my friends have had the liberty to discuss these topics openly, many haven't had that chance or a medium perhaps.
So here are the basics of photography... Photography 101... for the sake of argument, this article is limited to Dslrs and Slrs, but the techniques can be applied to any type of photograph recording device.
Lets attack unarguably, the most common term in photography - A Dslr
Digital Single-Lens Reflex (camera) is basically digital cameras which use the (old) Single-Lens Reflex (SLR) technology and replace the film with a digital back (sensor). The Single-Lens Reflex is of interest to us at this point since we are going to use it further in this article and manipulate it in subsequent topics. To think about it in simple terms, think about a periscope, only in this case, the light is first bounced off a 45 degree mirror into a condenser lens finally into a Penta-prism before emerging out of the view finder. When the shutter release button is pressed all the way down, the mirror retracts and the sensor sees what you essentially saw earlier through the view finder. Hence, the term Single-Lens Reflex. Based on the sensor (film) size, they can be categorized into Crop Sensor (APS-C), Full Frame (35mm format), Medium Format and Large Format cameras. Most of us will be wielding a crop sensor camera with a crop factor of 1.5 for Nikon and 1.6-1.7 for Canon. I am going to restrict our discussion to crop sensors and full frames for ease.


The terms and concepts that follow have certain uniqueness. Each of them can be attributed to a part of the entire camera and normally aren't swapped or mixed.
Shutter - Body function
Aperture - Lens function
ISO (ASA) - Sensor (Film) function
Whether Film or Digital, it has always been the amalgamation of these 3 things that takes the snaps. Lets dive a bit into each of these.
Aperture and Depth of Field (DoF)
When light travels, through the camera lens, it is actually travelling through a tunnel or a pipe. How much light reaches the other side is determined by the size of the hole or the opening. Aperture when loosely translated means a opening. Based on the size of the opening, the volume of light hits the sensor. The concept of aperture has been developed from the pupil in the human eye. Brighter the light, smaller the pupil to avoid irritation. Lesser the light wider the pupil so that we can see better. The second concept of Depth of Field or DoF is again borrowed from the pupil. Bigger the pupil, more the optical aberration and hence 'messier' the image, while smaller the pupil, sharper is the image and also the distance over which the image is sharp. If we extend it to the camera lens, bigger the hole size (aperture), more the light and optical aberration and hence shallower the DoF, while smaller the aperture, less light, more is the distance over which the image looks sharper and hence greater is the DoF.
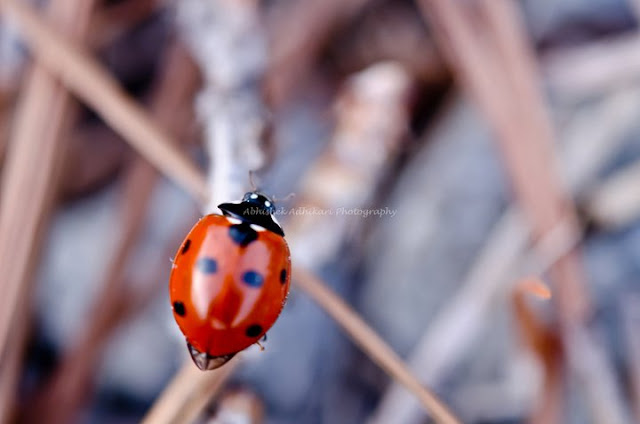
This Ladybug is around 5mm in length. Notice how the head region and the body in that plane is sharp. The back and the grass in front are all blurred out
Aperture Priority or Aperture Value Mode - A (Nikon), Av (Canon), AV (Pentax)
In this mode the Aperture value is fixed and the camera processor decides the shutter speed for the correct exposure. When you turn the dial, what essentially happens is that the diaphragms in the lens open up or close down to control the size of the hole. In film cameras this was done by an aperture ring on the lens itself. In dslrs, this is done from the camera body. But finally the lens opening is only adjusted through a small lever extending from the camera body. The visible figures on the screen look something like this - f4, f4.5, f5, f5.6, f6.3, f7.1, f8, f9, f10, f11, so on and so forth. Interesting to note here are two things -
- amount of light decreases with increase in aperture value and vice versa; ie f4 allows more light than f5.6 and conversely f11 to f8 allows more light
- f4 is half of f8 while f5.6 is half of f11. So there are two mathematical series going on here.
Without going into the mathematical (geometric) progression (beyond the scope of this article), please remember that f4 to f8 progression is
2 stops similar to f5.6 to f11. Hence, f4 to f5.6 is one complete stop. Now here is the most important part - every time you change
one whole stop, the light changes by half or double. So from f4 to f5.6 the light has halved while f11 to f8 the light has doubled.
Most of the cameras these days have the provision of breaking down the complete stop into 3 steps, but the relationship remains. The above confusing relationship is what will be widely used further for proper exposures. It is confusing in the beginning but as you practice more, it becomes much easier.
This is taken at f2.8. Notice the narrow plane of focus. The mushroom head and some grass below it is in focus.
For DoF, lenses with F1.4, F1.8 and F2.8 are called fast lenses since their apertures are very wide. For these lenses, at the Max aperture (smallest aperture value = Max hole size) the focal plain will be few centimeters wide and hence everything else will be blurred, giving a wonderful appearance. Since such aperture sizes are difficult to manufacture repeatably, such lenses are very costly. Similarly at aperture values approaching f6.3 to f8 and beyond, the DoF is several meters wide which means most of the photograph will be in focus and sharp.
This is taken at f16. Notice the sharpness which extends right up to the structures way behind.
From application stand point, Higher Aperture (smaller f value), More Light, Lesser DoF. Lower Aperture (higher f value), Less Light, Higher DoF.
Shutter and Shutter Speed
Essentially, the dslr sensor is like the film. Moment you expose it to light it will start recording data. Whether you are at the right focus or frame or is the light sufficient; it simply doesn't care. So what we have essentially here is a curtain; a piece of black cloth on a spring, which hides the sensor (film) from light till we feel we are ready to click. Hence, you might have observed that the Shutter release button has 2 stops - first, at half way, it adjusts focus (in case of auto-focus) and finally it clicks when you press all the way through. Shutter Speed would then literally mean, the speed at which we open and close the curtain to allow the light to fall on the sensor (film). This brings us to the next term.
This is the D7000 Shutter assembly. Important to notice is the marked region which shows several shutter curtains.
Shutter Priority or Time value Mode - S (Nikon), Tv (Canon), TV (Pentax)
In this mode, the camera allows us to fix the value of the shutter speed. What you control is the rate at which the curtain opens and closes the sensor (film). In turn, what you control is the amount of time for a volume of light (determined by aperture) falls on the sensor (film). When you use the wheel or the dial for the Shutter speed, the numbers either increase or decrease on the screen. What you see for example is 250, 320, 400, 500, but what it means is 1/250, 1/320, 1/400 of a second. Now the important part in this part of the discussion - 1/250 of a second is 1/2 of 1/125. Hence 1/250 lets the same volume of light to fall on the sensor for 1/2 the time of 1/125. Hence 1/125 to 1/250 is one full stop and exposure time is half. Similarly 1/60 to /30 is again a full stop while exposure time has doubled. The series goes something like this - 1", 1/2, 1/4, 1/8, 1/15, 1/30, 1/60, 1/125, 1/250, 1/500, so on and so forth. Newer cameras give 1/3 stop arrangements so you can get something like 1/60, 1/80, 1/100, 1/125, 1/160, 1/200, 1/250, so on and so forth. Even though, 1/60, 1/125, 1/250, is the original series, the relationship between 1/100 and 1/200 is the same.
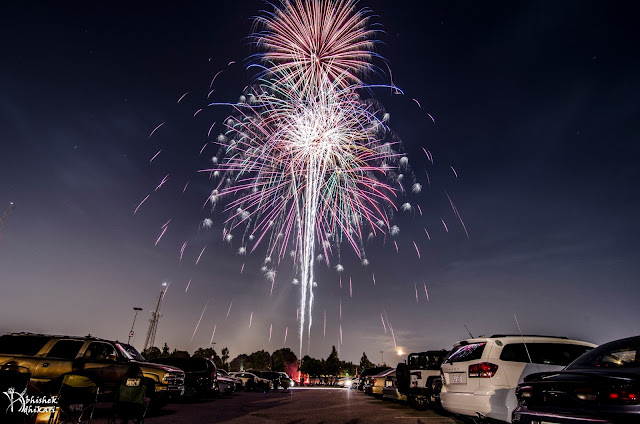
Fireworks - it is a 87 seconds exposure (motion blur)
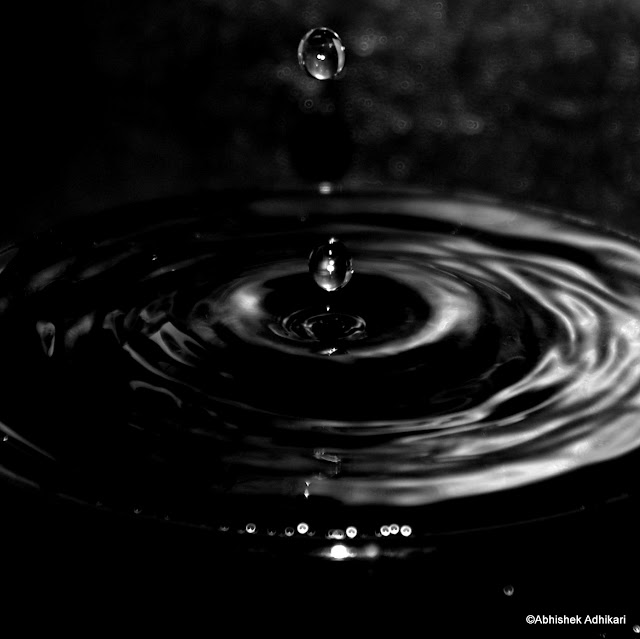
Water drop - taken at 1/320 of a second (freeze motion)
From application stand point, Higher Shutter Speed, Lesser Light and Motion Freeze. Lower Shutter Speed, More Light and Motion Blur
ISO (ASA)
The final of the triangle, ISO, as pointed out earlier is a sensor (film) characteristics. It is basically a medium to gather more light. Loosely, ISO can be compared to worker ants. More the number of ants, faster is the food collected. Say it is a bright day outside. For the same brightness of the image, keeping the other settings the same, the amount of light collected by ISO 100 will obviously be less than ISO 200 and so on. However, as your ISO increases, so will the digital noise. This is primarily because ISO produces brightness artificially through pre-written algorithms. Lower ISO is a darker smoother image, Higher ISO is a grainy image. A balance needs to be set and each camera has its own sweet-spot.
Here is a cheat sheet summarizing the above.
So long for now. Happy clicking and experimenting...
Cheers!!!
- Abhishek


